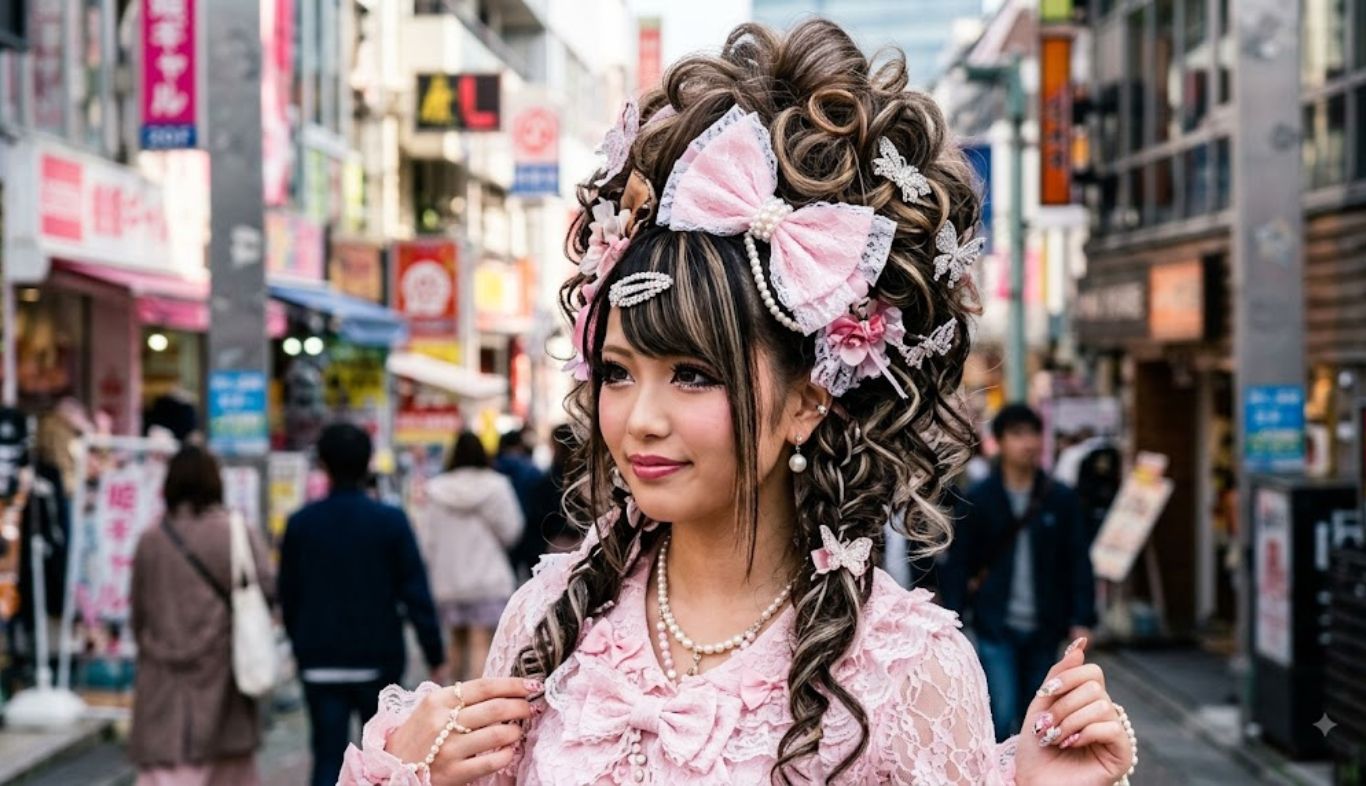
The Hime Gyaru Updo combines dramatic volume, soft curls, elegant accessories, and the unmistakably feminine spirit of Japanese gyaru-inspired fashion. The result is polished without looking overly severe, playful without losing its sophisticated edge, and glamorous enough for parties, photoshoots, weddings, or simply a day when you want your hairstyle to make a statement. At first glance, this hairstyle may seem complicated. However, the basic technique is surprisingly approachable once you understand its structure. The secret isn’t simply making the hair bigger. Instead, it’s about balancing volume, shape, curls, face-framing pieces, and accessories.
Hime gyaru is also part of a broader Japanese fashion landscape in which distinctive subcultures have influenced international style. Vogue has documented how gyaru developed alongside other Japanese street-fashion movements associated with areas such as Shibuya and Harajuku. Whether you have naturally long hair, medium-length hair, or rely on extensions, you can adapt the look. So, let’s break down everything you need to know.
What Is a Hime Gyaru Updo?
A Hime Gyaru Updo is a glamorous upstyle inspired by the princess-like aesthetic associated with hime, or “princess,” fashion and the polished beauty traditions of gyaru styling. The hairstyle generally emphasizes height, rounded volume, curled sections, decorative accessories, and carefully arranged face-framing hair. It often looks elaborate because several relatively simple techniques are combined into one balanced design.
Think of it as a hairstyle with a visual hierarchy:
- Volume creates the silhouette.
- Curls add softness.
- Face-framing sections add definition.
- Accessories provide the finishing sparkle.
This combination makes the style instantly recognizable. The look can also draw visual inspiration from older Japanese hairstyling traditions. Japanese hairstyles have a long history of sculptural forms and decorative elements; Vogue’s discussion of Edo-period hair, for example, notes elaborate shapes accompanied by combs, ribbons, flowers, and other ornaments. Of course, a modern hime gyaru hairstyle isn’t a direct reproduction of historical Japanese hair. Rather, it’s a contemporary fashion interpretation that mixes different aesthetic references.
Why the Style Is So Eye-Catching

The biggest reason this updo stands out is proportion. A simple bun sits close to the head. A hime gyaru-inspired updo deliberately creates more visual height and width. That extra dimension gives the hairstyle a doll-like, princess-inspired quality. The style also photographs beautifully. Large curls catch light. Pearls and rhinestones create small highlights. A lifted crown makes the face appear surrounded by a soft frame. Meanwhile, carefully placed side sections can create the illusion of longer, more elegant facial proportions.
That’s why the hairstyle works particularly well for:
- Formal events
- Birthday celebrations
- Photoshoots
- Cosplay-inspired outfits
- Japanese fashion looks
- Bridal-inspired styling
- Concerts and parties
- Editorial fashion
- Social-media content
The trick is not to make every part of the hairstyle equally dramatic. A little restraint goes a long way.
The Signature Features of a Hime Gyaru Updo
Before styling, it helps to know what you’re actually trying to create.
| Feature | Purpose | Styling Approach |
|---|---|---|
| Crown volume | Creates height | Teasing or padding |
| Rounded bun | Adds elegance | Roll or twist hair |
| Soft curls | Creates movement | Curling iron or rollers |
| Face-framing strands | Softens the face | Curl and shape carefully |
| Decorative accessory | Adds glamour | Bow, pearl, crown, or clip |
| Smooth surface | Keeps the look polished | Light brushing and hairspray |
| Structured silhouette | Makes the style recognizable | Pin strategically |
The overall appearance should be controlled but not stiff. That’s an important distinction. If every strand is sprayed flat, the result can look more like a formal salon updo than hime gyaru. On the other hand, too much looseness can make the hairstyle lose its distinctive shape.
How to Prepare Your Hair
Good preparation can make the difference between an updo that lasts two hours and one that survives an entire evening. Start with clean, completely dry hair. If your hair is extremely slippery, however, freshly washed strands may be difficult to pin. In that case, a light texturizing product can provide useful grip.
Step 1: Detangle Carefully
Brush from the ends upward instead of attacking knots from the roots. This reduces unnecessary pulling and helps preserve the hair’s condition.
Step 2: Add Texture
Apply a lightweight mousse or texturizing spray through the lengths. Don’t soak the hair. You want enough texture to help curls and pins stay in place, not so much product that the hair becomes sticky.
Step 3: Protect Against Heat
If you’re using a curling iron, wand, or heated rollers, apply an appropriate heat-protection product first. This is especially important if you frequently recreate high-volume hairstyles.
Essential Tools for the Look
You don’t need a professional salon kit.
A practical setup includes:
- Fine-tooth teasing comb
- Paddle or smoothing brush
- Curling iron or curling wand
- Heat protectant
- Light mousse or texturizing spray
- Strong bobby pins
- Small clear elastics
- Hair padding or a small donut
- Flexible hairspray
- Decorative bow, pearl clip, crown, or headband
- Optional hair extensions
Choose pins that closely match your hair color. They disappear much more effectively. For particularly thick or heavy hair, use longer pins designed for stronger hold. Cross two pins over one another when securing an important section. This simple technique creates considerably more stability.
The 11-Step Hime Gyaru Updo Method
Now for the fun part.
Step 1: Section the Hair
Separate the front from the back. Keep the face-framing sections loose while gathering the rest of the hair. You can use clips to prevent accidental mixing.
Step 2: Create the Crown
Take a section at the top of your head and gently tease underneath it. Work in small sections rather than aggressively backcombing the entire crown. Smooth the surface afterward. The goal is a rounded mound, not a tangled nest.
Step 3: Build the Main Ponytail
Gather the back section into a high or medium-high ponytail, depending on your preferred silhouette. A higher ponytail generally produces a more youthful and dramatic result. A lower position creates a softer, more elegant interpretation.
Step 4: Add Padding if Needed
If your hair doesn’t naturally provide enough volume, use a small hair donut or lightweight padding. This is nothing to feel guilty about. Extensions and padding are standard tools for creating exaggerated fashion hairstyles. Position the padding underneath the hair rather than leaving it exposed.
Step 5: Form the Updo
Wrap sections of the ponytail around the padding or into a rounded bun. Pin each section individually. Don’t try to secure everything with two pins. Several smaller anchors are usually more reliable than a couple of oversized ones.
Step 6: Shape the Crown
Gently pull selected strands upward to increase the height. Then smooth the surface with a brush. This is where the hairstyle starts to develop its characteristic princess-like silhouette.
Step 7: Curl the Front Sections
Curl the loose sections away from your face. Use a medium-sized barrel for classic soft curls. Hold the hair around the barrel briefly rather than overcooking it. After releasing the curl, allow it to cool before brushing.
Step 8: Create Face-Framing Pieces
Leave two or more carefully controlled sections around the face. These can be curled, waved, or lightly straightened at the ends depending on the desired aesthetic. The important thing is intentionality. Random strands can look messy. Deliberately placed strands look romantic.
Step 9: Add the Accessories
Now bring in the sparkle. A bow behind the bun gives a sweet finish. A pearl clip creates elegance. A small tiara or crown pushes the princess theme further. Avoid adding every accessory you own. One major accessory plus one or two small accents is usually enough.
Step 10: Lock the Style
Mist hairspray from a reasonable distance. Focus on the areas that actually need support: the crown, bun, and loose curls. Avoid saturating the entire head.
Step 11: Final Balance Check
Look at the hairstyle from the front, sides, and back.
Ask:
- Is the crown high enough?
- Is the bun centered?
- Are the curls balanced?
- Are the face-framing sections similar in size?
- Are any pins visible?
- Does the accessory sit naturally?
Make small adjustments before adding more hairspray.
How to Create Bigger, Better Volume
Volume is probably the most important technical element. However, bigger isn’t always better. A common beginner mistake is teasing the crown excessively. This can produce an uneven shape and make the hair difficult to brush out later.
Instead, use controlled volume. Start with a small amount of teasing near the roots. Add more only where necessary. Smooth the outer layer with a soft brush. If you want significant height without excessive teasing, padding is usually the better option.
Extensions can also dramatically change the final result. They add both length and mass, making it easier to create substantial buns and cascading curls.
Curling Techniques for a Softer Finish
The right curls make the difference between a polished updo and a stiff-looking one. For a classic hime gyaru-inspired finish, use medium or large curls rather than tiny ringlets.
A useful method is:
- Divide the hair into manageable sections.
- Apply heat protectant.
- Curl each section away from the face.
- Let the curl cool.
- Gently separate it with your fingers.
- Finish with flexible hairspray.
If you want a more dramatic result, alternate slightly different curl sizes. If you prefer a softer modern style, use large waves instead. The latter approach can make the hairstyle feel more wearable for everyday occasions.
Designing the Face-Framing Sections
Face-framing hair deserves special attention because it affects the entire visual balance. Too much hair around the face can make the hairstyle look heavy. Too little can make the updo appear disconnected from the face. Try creating a gentle curve that follows the cheekbone before moving backward toward the ears.
For a more traditional princess-inspired effect, keep the sections polished and symmetrical. For a modern interpretation, allow slight asymmetry. The key is to make the asymmetry look deliberate.
Choosing the Right Accessories
Accessories are where you can personalize the hairstyle.
Pearls
Pearls create a classic, elegant effect. They’re especially useful if your outfit is white, cream, blush, champagne, or pastel.
Bows
Bows emphasize the cute side of the aesthetic. Large satin bows work particularly well when paired with curls and a high bun.
Crowns and Tiaras
A small crown immediately strengthens the princess theme. Keep the crown proportional to the hairstyle. A huge crown can overwhelm the face.
Rhinestones
Rhinestone pins provide sparkle without requiring a large accessory.
Place them near the bun or above one ear.
Flowers
Small artificial flowers can create a romantic finish, particularly for spring and summer events.
Adapting the Updo to Different Hair Lengths
You don’t need waist-length hair.
Short Hair
Use extensions or a hairpiece to create the bun. Keep the natural front sections visible so the hairstyle still feels connected to your actual hair.
Medium Hair
Medium-length hair can work beautifully. Use padding to increase the size of the bun, then concentrate the remaining length into curls.
Long Hair
Long hair gives you the most flexibility. You can create larger buns, fuller curls, and longer face-framing pieces. However, long hair is heavier, so stronger pins and more secure anchoring may be necessary.
Matching the Hairstyle to Your Face Shape
There are no strict rules here. Personal preference should always come first. Still, small adjustments can change the effect.
| Face Shape | Styling Idea |
|---|---|
| Oval | Most proportions work well |
| Round | Add crown height and elongated side sections |
| Square | Use soft curls around the jaw |
| Heart | Keep some volume around the lower sides |
| Long | Avoid excessive crown height |
| Diamond | Use balanced side volume |
These aren’t rigid beauty rules. They’re simply starting points. Your hairstyle should make you feel confident rather than forcing you into a particular formula.
Common Hime Gyaru Updo Mistakes
Even experienced stylists can run into problems.
Too Much Teasing
Excessive backcombing can make the hair difficult to manage and remove later.
Too Much Hairspray
Heavy product can eliminate the soft movement that makes the hairstyle attractive.
Weak Pins
If the bun is heavy, tiny pins may slide out. Use stronger pins and anchor the hair close to the scalp.
Uneven Volume
Check the hairstyle from multiple angles. A shape that looks perfect from the front can appear lopsided from the side.
Overloading Accessories
The hairstyle itself is already dramatic. If you add a giant bow, oversized crown, rhinestones, flowers, and multiple clips, the individual details can compete with one another. As the saying goes, sometimes less really is more.
How to Make the Updo Last Longer
If you’re wearing the hairstyle for an event, durability matters. Before styling, make sure the hair has enough texture to grip pins. Once the bun is built, insert pins diagonally into the structure rather than straight down.
Crossing pins can also increase security. For very long or thick hair, divide the bun into several smaller sections and secure each one independently. After finishing, avoid repeatedly touching the hairstyle. This sounds obvious, but it’s one of the easiest ways to loosen an elaborate updo.
If you’re attending an outdoor event, humidity can also affect curls and volume. A suitable anti-humidity styling product may help, although results vary by hair type.
Creating a Modern Hime Gyaru Look
You don’t have to recreate a highly dramatic version every time.
A modern interpretation can be much simpler:
- Medium crown volume
- One rounded bun
- Large loose curls
- Minimal pearl accessories
- Soft pink or neutral makeup
- Clean, polished finish
This version keeps the recognizable spirit while making the hairstyle easier to wear with contemporary clothing. Japanese fashion continues to influence global style, and modern audiences often reinterpret established subcultures rather than copying them exactly. Vogue has recently highlighted how younger Asian consumers mix Japanese gyaru with other aesthetics, including Y2K and contemporary trends. That means there isn’t one single “correct” modern interpretation.
Makeup and Outfit Pairings
A dramatic hairstyle works best when the rest of the look supports it.
For makeup, consider:
- Defined lashes
- Soft eyeliner
- Shimmering eyeshadow
- Blush
- Glossy lips
- Carefully shaped brows
The goal isn’t necessarily heavy makeup. Instead, focus attention on the eyes and create a cohesive feminine palette.
For clothing, the hairstyle pairs naturally with:
- Lace dresses
- Satin skirts
- Cardigans
- Fitted blouses
- Pastel dresses
- Ribbon details
- Pearl jewelry
- Feminine heels
For a more contemporary outfit, contrast the elaborate hairstyle with a simple monochrome dress.
That contrast can look surprisingly chic.
Hime Gyaru Updo vs. Other Japanese-Inspired Hairstyles
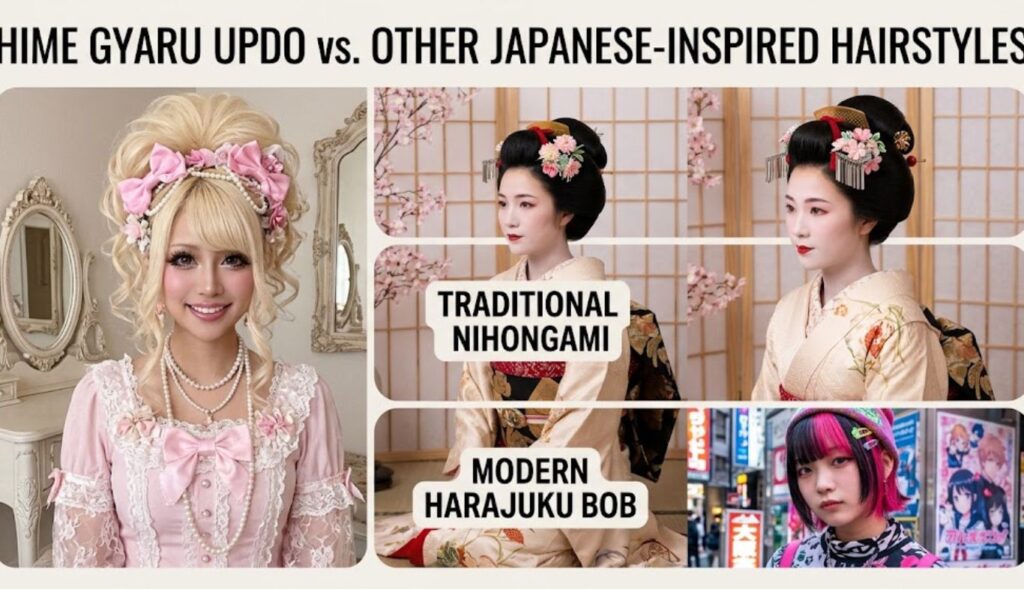
The hime gyaru aesthetic is sometimes confused with other Japanese fashion styles. However, they’re not identical.
Hime gyaru emphasizes princess-like glamour, feminine details, volume, curls, and decorative styling. Classic gyaru is a broader category with many variations and can include different hairstyles, makeup approaches, and clothing styles.
Lolita fashion is primarily a clothing-centered aesthetic with its own historical development and distinctive silhouettes. Although hime gyaru and Lolita can share bows, lace, curls, and feminine details, they shouldn’t be treated as the same style.
Harajuku fashion is an even broader term associated with diverse Japanese street-fashion expressions rather than one specific hairstyle. Understanding these distinctions helps you appreciate the style instead of reducing several different Japanese fashion cultures into one category.
For additional background on Japanese fashion and hair history, Vogue’s coverage of historical Japanese hairstyles and contemporary street fashion offers useful context.
A Simple Styling Checklist
Before leaving the house, run through this quick checklist:
- Hair is completely dry.
- Heat protectant was used before hot tools.
- Crown volume is balanced.
- Bun is firmly secured.
- Face-framing curls are intentional.
- No obvious pins are visible.
- Accessory is centered or deliberately positioned.
- Hairspray has been applied lightly.
- Hairstyle has been checked from multiple angles.
- The overall look feels comfortable.
If all ten boxes are checked, you’re ready to go.
Frequently Asked Questions
1. What is a Hime Gyaru Updo?
A Hime Gyaru Updo is a voluminous, feminine hairstyle inspired by hime and gyaru aesthetics. It commonly features a lifted crown, rounded bun, curls, face-framing sections, and decorative accessories.
2. Can I create a Hime Gyaru Updo with short hair?
Yes. Extensions, clip-ins, and lightweight hair padding can help create the required volume and bun shape. Short hair can also be styled into a partial updo with decorative curls.
3. Do I need hair extensions?
No. Extensions aren’t essential, but they’re useful if you want a particularly large bun or long cascading curls. Padding can provide volume without adding significant length.
4. How do I make the hairstyle stay in place?
Use textured hair, strong bobby pins, secure anchoring, and flexible hairspray. For heavy hair, divide the bun into sections and pin each part individually.
5. What accessories work best?
Bows, pearls, small crowns, rhinestone clips, flowers, and jeweled pins all work well. Choose one main accessory and use smaller details as accents.
6. Is this hairstyle suitable for everyday wear?
Absolutely. A simplified version with moderate volume and fewer accessories can work for everyday occasions. You don’t need an enormous updo to capture the aesthetic.
7. Can straight hair be used?
Yes. Straight hair can actually provide an excellent smooth foundation. Add curls only where needed, particularly around the face and ends.
8. How long does a Hime Gyaru Updo take?
A beginner may need around 30–60 minutes, depending on hair length, thickness, accessories, and experience. With practice, the process becomes considerably faster.
9. Is teasing necessary?
Not always. Teasing creates root volume, but padding, rollers, mousse, and extensions can provide alternative ways to build height.
10. How can I avoid damaging my hair?
Use heat protection, moderate temperatures, gentle teasing, and careful removal of pins and accessories. Don’t rip through heavily teased sections. Loosen the style gradually with your fingers and a wide-tooth comb.
Final Thoughts
The Hime Gyaru Updo is more than a large bun with curls. Its appeal comes from the combination of proportion, softness, glamour, and personality. Start with a strong foundation. Build controlled volume instead of uncontrolled teasing. Shape the bun carefully, curl the face-framing sections, and finish with accessories that complement rather than overwhelm the hairstyle.
Most importantly, don’t be afraid to adapt it. Fashion evolves because people reinterpret existing ideas. Japanese street-fashion styles have repeatedly demonstrated how distinctive subcultures can travel internationally while being transformed by new audiences. So whether you’re preparing for a special event or simply want to experiment with a princess-inspired aesthetic, the hime gyaru approach gives you plenty of room to play. Start small, practice the silhouette, and refine the details. Before long, you’ll have an updo that feels polished, glamorous, and uniquely yours.